how to hide rabbit hole buildings in the basement, access the basement with 4 steps from the outside, lots can be much smaller than the rabbit hole object
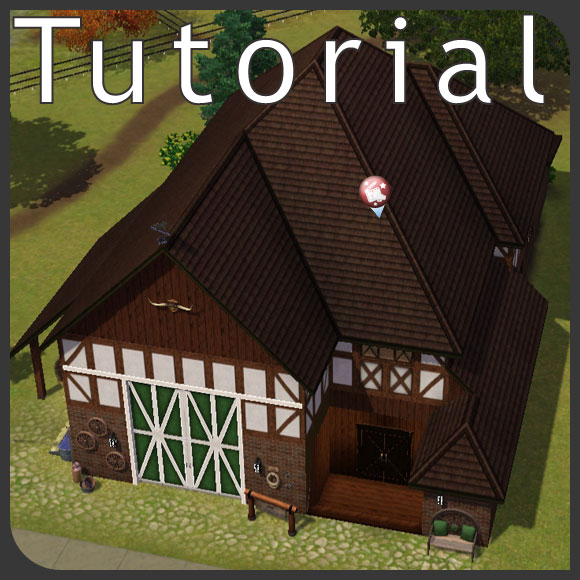
Advanced technique - You should have some experience to be able following this tutorial without difficulty!
You can find more basic details about manipulating basement tool basements in our Tutorial: Fresh Air for basements built with the basement tool
German version - Tutorial: Rabbitholes (auf kleinen Grundstücken) mit selbst gestalteten Gebäuden
Making basements accessible with short stairs from the outside can lead to interesting looking buildings. Using this method to hide the rabbit hole objects allows you to give the rabbit hole houses any look you can imagine and still keept their functionalty easily accessible for Sims. Make the buildings unique or build them all with the same style to give your city a repeating and typical face.
Even better - hiding the rabbit hole objects in the basement allowes you to place large objects on relatively small lots - all without downloads: The large movie set rabbit hole from EP Late Night (film carrier) can be placed on a lot with a minimum length of 23 squares (6 tiles wide). This way all rabbit holes can be placed in small or crowded worlds, no need to spare even one of them.
Right now we are working on a list with minimal basement/lot sizes and will publish it here.
Of course it's also possible to hide more then one rabbit hole object on one lot. Sims will see and interact with all their icons in neighborhood view. Being on the lot and switching to basement level shows all rabbits. Clicking them will give your Sim the typical options.
Overview
In this tutorial we will
- figure out the neccessary basement dimensions for the chosen rabbit hole object
- build the basement 12 steps above ground
- rip a small entry area into the lot ground
- connect the street level to the basement with 4 steps
- hide the rabbit hole object in the basement
- build a nice looking fake building shell around the raised basement
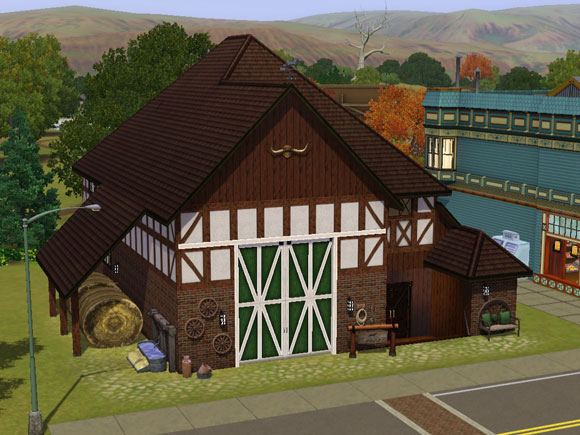
I am going to build a film set into an old barn on a 20x30 lot at Appaloosa Plains:
Building and testing community lots directly from live mode
Working with basements needs lots of testing. Make sure your Sim accepts all of your suspect constructions before building the next one. Otherwise you may end up with Sims denying to enter one or more rabbit holes, see Tutorial: Building and testing community lots directly from live mode.
Positioning the rabbit hole entry
Decide where you want the rabbit hole entry to be. I prefer the sides of the house front to make it look like a minor side entry. Eyecatching fake main entry will be placed in the middle of the front.
If you add a parking lot on one side of the fakebuilding you can even put the rabbithole entry facing the parking lot instead of facing the street. Using different lot sides for placing rabbithole entry and fake main entry works also well for corner lots.
Placement options depend of the necessary basement length, of course. Figure those out first.
 Measuring Basement dimensions
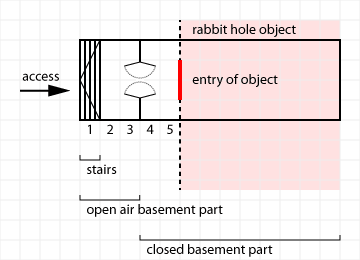
I experienced well working results with 4 squares wide basements. These 4 squares are needed to give Sims some space to enter the rabbit hole object. The whole entry area works fine with 5 sqares length - three for the outside including the stairs, 2 on the inside in front of the rabbit hole entry. Additionally we need length depending on the object - smaller objects need of course less additional length.
Build a basement 4 tiles wide and as long as the lot size allowes. Activate the cheat moveobjects on. Switch down to basement view and place a rabbit hole object. If you have 5 squares in front of the object, it's just perfect. Test with a sim, if the entry is working. Use the option Teleport Me Here to bring your Sim down into the basement, see Tutorial: Building and testing community lots directly from live mode:
 Pick your object up and push it backwards. If there are now more than 5 squares count those, delete the rabbit hole object and delete the counted number of unneccessary basement fields.
If you can't place the rabbit hole at all or have less then 5 squares, your basement needs to be longer, add fields.
Control if the placed rabbit hole can't be seen from the outside. Sometime they poke out of the ground. I think this depends on their position in relation to the basement borders - moving the object half a field to the entry region or adding one field of basement let them disappear.
After figuring out the needed length delete the rabbit hole object. It would block some of the following building steps.
1. Raising the terrain
Raise the lot ground up in the center - make it higher than a level:
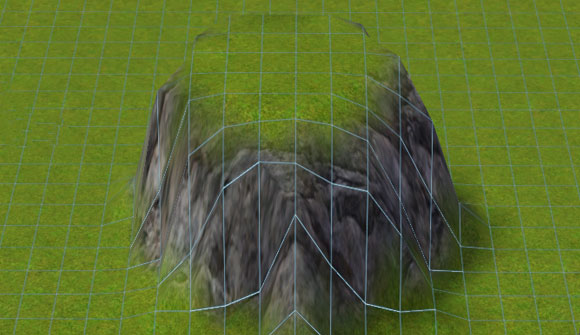
Place 2 pieces of wall diagonally, include the raised area between these walls. Use the terrain tool > level terrain and level from one wall to the other:
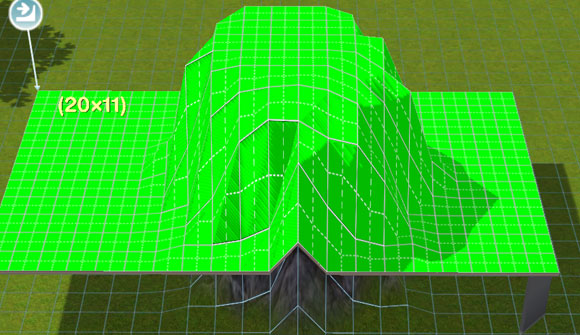
The ground will be shortend to 12 steps. This is the hight where we are placing our main basement including the rabbit hole object.
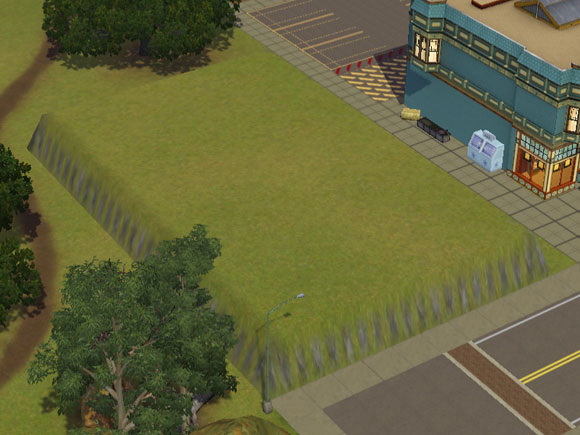
I like to level the whole terrain at the desired height to have free choice of positioning the basement:
2. Building the basement
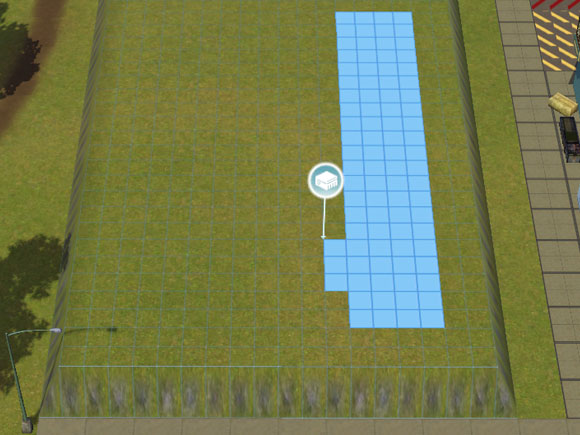
Build a basement 4 tiles wide and as long as neccassary on the raised terrain. As all main building parts you need at least one square distance to the lot border. Some free squares to the lot border gives you later more freedom with your fake building shell. Rest of the placement is up to your wishes. The basement needs temporarely 3 extra tiles for constructing purposes:
3. Connecting the outside to the basement
Update The order of these steps needs to be different since seasons. The hole can't be generetad with the short stairs anymore. It has to be ripped into the ground before lowering the front row for the short stairs. Read here in more detail how to rip the hole: Tutorial: Fresh Air for basements built with the basement tool!
We are going to lower the front basement wall 12 steps. Type the cheat constrainfloorelevation false into your cheat console. Lower the terrain coming from street height till the foundation wall shows. Add a new row of foundation, starting on the lowered terrain and connect it to the existing basement, delete the new row right away afterwards:
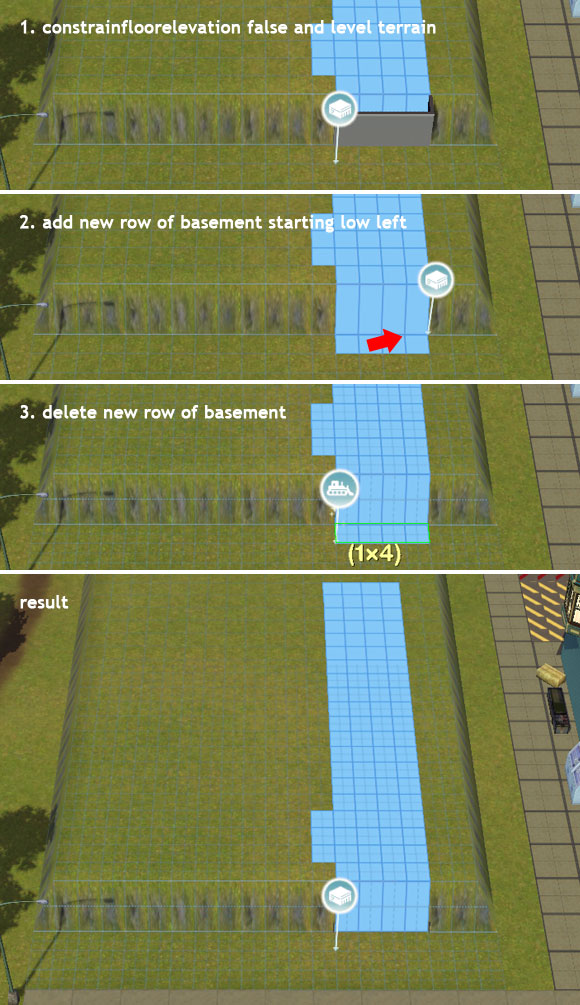 For more detailed information on this step read our Tutorial: Fresh Air for basements built with the basement tool.
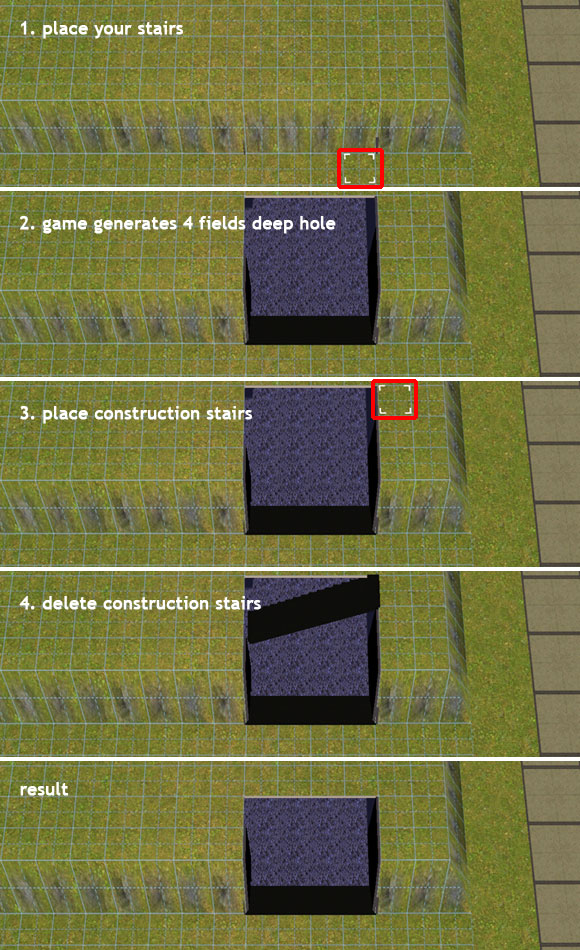
Choose stairs and place them on the basement border. It can happen that wider stairs deny to be placed, small work just fine. You may have less difficulty placing the stairs with switching the cheat to constrainfloorelevation true.
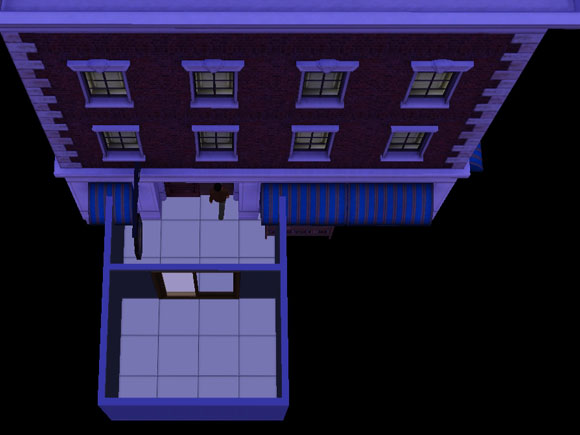
The stairs will rip a 4 squares deep hole into the lot ground. We need our hole only 3 squares deep. Place construction stairs and delete them immediately. This will close the unwanted row:
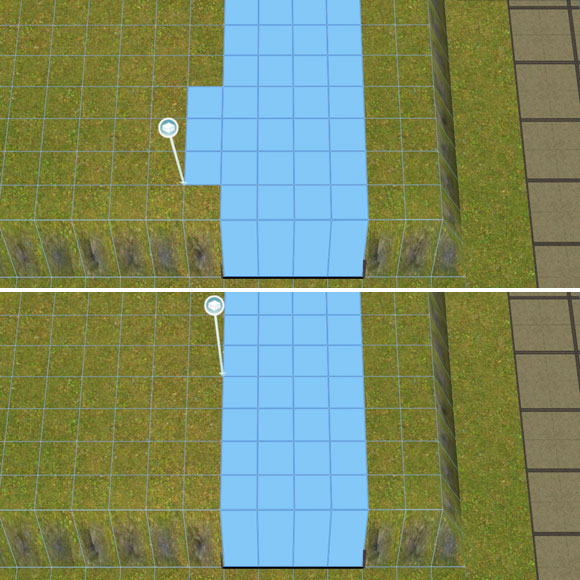
 For the placement of the construction stairs we needed the three extra squares. Those can be deleted now:
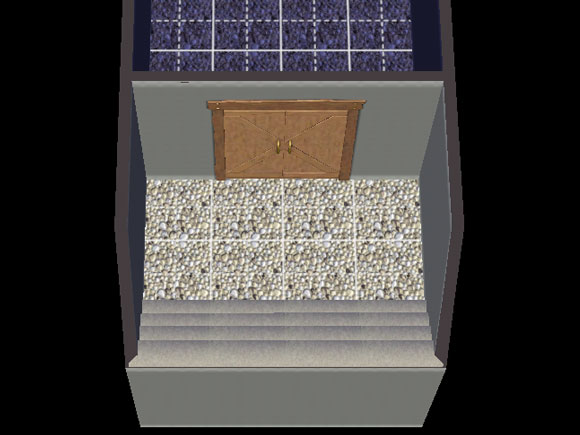
4. Blocking the view into the basement gap
Place a wall with a double door where the gap in the ground ends:
5. Place the rabbit hole object and test it
If you haven't the cheat moveobjects on activated do it now. Choose the rabbit hole object an place it in the basement. Leave 2 squares beetween double door and objects entry free:

Control if the rabbit hole object is not to bee seen from the outside:
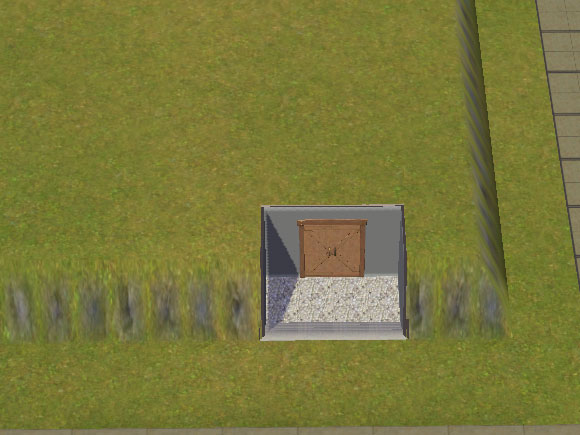
Enter live mode and direct a sim to the rabbit hole to test the entry before building the outside fake shell:

6. Constructing the building shell
Level the terrain around the raised basement:

Use foundations and/or walls to enclose the structure. You might want to use the cheat constrainfloorelevation false again to level out the walls:

Finish your building! Congratulations you hid the rabbit hole, kept it easily accessible and can give it your own design now!
It's your turn!
You have questions or suggestions? Please leave us a comment – no registration needed!
We'd like to ask you for your star vote!
More The Sims 3 Tutorials
- seasonal lot marker
- rabbithole design
- rip open basements
- CaSTable ceiling slope | airy rooms
- CaSTable ceiling slope | attic rooms
- outside stairs with walls beneath
- hill side | hovering building
- hill side | building into slope
- pergola
- routable pavilion
- add public picnic
- chaging community lots | live mode


Thanks for this interesting tutorial. It made me realize that rabbit hole buildings don’t need to actually fit on the lot they’re on. I just placed the Plumbob Pictures backlot on a 20×30 lot and let it be half off the edge. (Though your custom shell looks much nicer!)
Wunderbar, dass es noch geklappt hat! In der Tat ist das Treppensetzen nicht unbedingt einfach. Insbesondere breitere Treppen verhalten sich bei der Methode oft widerborstig. Ich nehme daher immer die 1er Standardbreite und setze soviele ich brauche. Ich werde das Thema bei kommenden Bauten mal im Auge behalten und ggf. das Tutorial etwas umbauen! Ich danke dir nochmals für deine wertvollen Rückmeldung!
Danke dir, ich habs hinbekommen. :)
Wobei das mit der 4stufigen Treppe ganz schöne Fummelarbeit war, die ließ sich irgendwie nur platzieren, wenn man einen winzigen kleinen Punkt mit der Maus getroffen hat.
Zudem hatte ich Probleme beim Löcher reißen auf einem 20×30 Grundstück. Da hat er mir im Keller gesagt, dass ich keine Treppen im Fundament setzen kann, dabei war das ja gar kein Fundament? Auf einem 30×30 Grundstück hat es dann aber ohne Probleme funktioniert :)
Hallo durilda, ich hab mir nun beide Lots mit dem Filmset angesehen. Bei beiden konnte ich das Rabbithole wieder versenken, indem ich den Keller um eine Felderreihe verlängert habe. Sie funktionieren nun wieder korrekt.
Was dieses Tutorial angeht: Mir ist es auch nicht mehr gelungen, mit den kurzen Treppen gleichzeitig das Loch zu reißen. Mit der Standardtreppe funktioniert das aber noch. Also kann zunächst das Loch in den Boden gerissen und anschließend die vordere Kellerwand gesenkt werden. Dann geht es wie gewohnt weiter. Ich hoffe, das kannst du nachvollziehen. Ansonsten gibt es hier noch ein detailliertes Tutorial zum Reißen der Löcher. Ich danke dir nochmal für deinen Hinweis und auch für die Bebilderung, die mir das Problem schnell deutlich gemacht hat!
Hallo durilda, ich danke dir für deine ausführliche Nachfrage. Ich werde mir das Thema in Kürze mal genau anschauen. Kann sein, dass sich an dem Thema mit Seasons was geändert hat. Die beiden DL-Lots hier, die mit dieser Technik gebaut wurden, werde ich auch nochmal prüfen. Ich melde mich ~loh~
Hi Simension,
kann es sein, dass das irgendwie nicht mehr tut? (Seit einem Patch oder so?)
Ich sitz jetzt seit einer Ewigkeit dadran, das so hinzubekommen, aber es klappt nicht. Vorhin hab ich dann gedacht, vielleicht mach einfach irgendwas falsch und habe mir eines deiner so gebauten Filmstudios heruntergeladen und ins Spiel geholt. Das wird aber auch nicht richtig angezeigt, es sieht dann so aus:
http://s14.directupload.net/images/121215/idh3hmcv.jpg
Wenn ichs selber versuche, komme ich bis zu „3. Connecting the outside to the basement“ zum Setzen der Treppen. Bis hierhin:
http://s1.directupload.net/images/121215/26lnc464.jpg
funktioniert noch alles wie es soll. Setze ich die erste Treppe, sieht es allerdings schon anders aus als bei dir auf den Fotos:
http://s7.directupload.net/images/121215/9pj6wu4z.jpg
Wenn ich dann versuche, die schräge Hilfstreppe zu setzen, kann ich machen was ich will, die lässt sich nicht dort platzieren.
Hast du eine Idee, was da schief läuft?
lg durilda